

Tech Tuesday: “Storyboard That!”
![]() Among the tech resources that can be helpful in narrative intervention are those that let you make your own story. Content creation apps and websites, often called “digital storytelling” tools (search Pinterest for many examples in this genre), provide great contexts for speech, language and literacy skill development for their ability to visualize story elements in cartoons or images.
Among the tech resources that can be helpful in narrative intervention are those that let you make your own story. Content creation apps and websites, often called “digital storytelling” tools (search Pinterest for many examples in this genre), provide great contexts for speech, language and literacy skill development for their ability to visualize story elements in cartoons or images.
Digital storytelling tools can be employed in parallel with Story Grammar Marker® manipulatives, icons, and maps in a variety of ways.
- You make it: Create a product that you can “unpack” the story elements of with students, with SGM® playing a key scaffolding role, of course.
- We make it: Co-create with students by allowing them to make choices to construct a story, with you handling parts or all of the actual tapping or clicking to move things along.
- They make it: Often facilitated with you providing a model, mediate a scenario where older students—MS/HS, or younger, depending on the tool—incorporate a situation or theme to create a story. See Ellis’ gradual release of responsibility model which parallels the above options.
These tools come and go, but a current (and venerated) one that provides most features for free is Storyboard That! Storyboard That! is basically a comic creator though choosable layouts that include the Frayer Model for Vocabulary. Note also that you can start simply with a “Cinematic” one-frame comic.

To get started, consider your setting (Scenes) and Characters and start dragging. Note that what you have highlighted will allow you different options. For example, you can edit the scene as I did to make it look more like sunset-time.

Once you have a scene and characters—unless you are immediately changing the setting in the following cell—one of my favorite tricks is to copy and paste a cell (click COPY CELLS, then just drag and drop on the next screen).

This saves a ton of time! Then just drag to reposition your character. You can also click the character, then click EDIT POSE and you can change everything from the facial expression, skin color to body positioning.

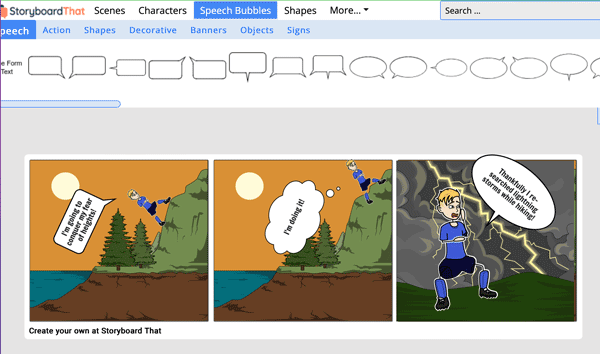
Speech Bubbles are, of course, an important element of telling a story in this way, and your good-old Thought Bubbles (think Critical Thinking Triangle) are in this menu too. These are easy to drag, rotate, expand or shrink, and add and edit/re-format text. See the very simple story I created below:
Once done, click SAVE AND EXIT. There are a variety of things you can do with your creation. One of my favorite options is to use the copy feature and make a different version: What kind of story is it if the character makes a different choice in cell 2? Note that this menu also allows you to print: A good option here is to save it as PDF from the print menu for you to have a digital copy, or you can always screenshot your creation from the edit mode.

Hope you can make some hilarious or dramatic stories using this tool!

Leave a comment
Comments will be approved before showing up.